Drywall Installation Naperville is a popular building material that’s easy to put up, but it takes careful planning and precision to get the job done right. Here are some tips to help you make your next drywall project a success.
Remember to follow the old construction adage “measure twice, cut once.” Accurately measuring and marking your cuts will ensure that your drywall fits perfectly.
The layout of drywall is a crucial element of a successful project. Choosing the right layout minimizes waste and cuts, reduces seams and makes taping much easier. It also allows for more precise placement of fixtures and wall boards, which will ensure a smoother overall look. Whether working alone or as part of a construction team, a skilled drywall contractor can maximize space and time by laying out the sheets before starting work.
The first step in a drywall layout is to determine the square footage of the room and divide it by 32 (the square footage of one drywall sheet). This will give you an estimate of how many drywall sheets are needed for the project. It’s a good idea to add one or two extra sheets to your calculation to account for cutting mistakes and waste.
Once you’ve calculated how many drywall panels you’ll need, it’s time to begin the installation process. The best way to start is by laying out the drywall on a level, dry surface. Use a T-square to mark where you’ll need to cut your drywall, then use a drywall saw to make your marks. You can choose to cut all your pieces ahead of time and save yourself some prep work, or you can cut them as you go to limit the number of mistakes. A keyhole saw is helpful for cutting spaces for electrical outlets and light switches, while a circle cutter is useful for curved areas.
Next, you’ll need to decide whether to hang your drywall horizontally or vertically. Horizontal drywall is recommended for walls, as it reduces the number of seams. However, if you’re working on an exceptionally tall wall, or if you’re working by yourself, vertical drywall may be a better option.
As you work, it’s important to follow all safety protocols and use personal protective equipment. You should also clean up your workspace and dispose of all materials correctly.
It’s also a good idea to take breaks to relax and recharge your batteries, especially if you’re doing the drywall on your own. This will help you stay fresh and focused, so you can finish the job quickly and accurately.
Prep Work
The preparation stage for a drywall project can make or break the outcome of your finished room. It involves assessing the space, gathering tools and materials, and making adjustments to create an optimal environment for drywall installation. Whether you’re doing a full renovation or simply replacing a damaged section, effective prep work can save time and money by eliminating costly mistakes and corrections.
To begin, assess the space and take accurate measurements of the walls and ceilings. This will help you determine how many full sheets of drywall you’ll need, as well as the amount of materials and supplemental materials you’ll require for your project. It’s also important to check that all electrical wiring and plumbing pipes are properly installed and located before you start working with drywall. Ensure that all studs and joists are straight and aligned, and add blocking between studs if necessary to support drywall edges.
When determining how much drywall you’ll need, consider factors like the size of the room and the number of fixtures such as light switches and outlets. It’s also helpful to plan out your cuts ahead of time to avoid waste and streamline the hanging process. You can either measure and mark where you’ll need to cut with a tape measure and T-square, or you can cut pieces as you go. If you choose to do the latter, make sure that you have a tool like a keyhole saw or a circle cutter handy for cutting spaces around outlets and other features.
To hang drywall, start by screwing into the studs using 1-1/4-inch screws. Use your marks from the ceiling as guides to make sure that every screw hits a stud. Work from one end of the wall to the other, and don’t forget to screw in the corners.
When you get to the outside corners, install a drywall corner bead. This will protect the corners and provide a smooth surface for finishing. It’s important to install these beadings correctly so that they’ll last and hold up to the elements.
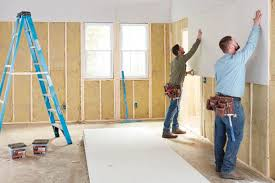
Hanging
Drywall installation (also known as gypsum board, greenboard, wallboard, plasterboard, and Sheetrock) is the most accessible step in a room remodel or upgrade for homeowners. It requires a little prior DIY skill but is an achievable project for most homeowners who want to reduce the cost of a room remodel by doing it themselves. It’s important to have a plan and be accurate with measurements before beginning to save time and money in the long run. It’s also recommended to rent a drywall lift or have a friend help you as the drywall panels are heavy and cumbersome to handle on your own.
Once your drywall is cut to size, apply construction adhesive to the back of the panel and position it to a stud. Drive screws through the top and bottom of the drywall into the studs. If you’re working on a ceiling, it’s best to work from the middle outward to avoid unsightly gaps that might not be covered by baseboard trim later.
Start your first row of drywall at the edge of the wall and work outward from there, spacing each new panel away from previous rows. Be sure to account for windows, doors and electrical boxes. Often, a longer piece of drywall will fit better in the corner, but don’t be afraid to use short panels as well as long ones. This will create less seams and help prevent cracking over time.
In the event of a gap at the corner, make a V-groove with your utility knife where the two panels meet and then smooth it over with a drywall knife. This will make the joint look less obvious when taped and mudded over.
The next row of drywall should be started a few inches below the end of the first one, staggered to prevent a gap. Then continue on down the wall, making sure to leave a 1/2 inch gap at the bottom for a baseboard to cover later.
If you’re running out of space to hang drywall, consider using a wood backer, which is a strip of OSB that is placed behind a stud or used to support two butted non-tapered edges of a drywall panel. This adds strength to the drywall and helps it stay in place, as well as protecting any wiring running through the studs.
Finishing
Drywall installation is a complex task that requires the right skills to get it done correctly. Taking the time to prepare properly for each step will help you avoid mistakes that can be costly in both time and money. Educating yourself by reading online tutorials and classes and investing in the proper tools will make a big difference as well. Don’t hesitate to seek advice from professionals at your local hardware store or experienced DIYers in online forums if you need it. Starting out on a smaller project is also a great way to build up your confidence before moving on to bigger projects.
Once the drywall sheets are securely fastened to the wall studs or ceiling joists, they’re ready for the final phase of work called “drywall finishing.” This process conceals the seams between gypsum board panels and creates a monolithic surface that’s ready to be decorated with paint, wallpaper or other finishes.
This step may include repairing any screw holes or other defects in the wall or ceiling, as well as priming and sanding the surface. Drywall installers typically adhere to all safety protocols while working and keep a clean, organized workspace. In addition, they frequently work as part of a team with carpenters and electricians to ensure a smooth workflow and seamless integration of systems within the walls of the home or business.
After the drywall is installed, the edges of the panels are finished with tape and joint compound to produce a smooth, indistinguishable surface. First, a layer of joint compound (often called mud) is applied to each seam and then topped with a strip of drywall tape. The edges of the tape are then “feathered,” which is a technique that involves gradually increasing the pressure and angle of the taping knife as you move away from the center of the joint. This helps to manage the excess compound and create a flush, even surface.
When finishing inside corners, first fold a piece of paper or fiberglass tape into a long, angled strip and apply it to the inside corner of the wall. Then, apply a layer of mud compound over the tape, again using a tool with an increased pressure and angle. Once the compound has dried, sand it smooth with a handheld pole sander.