Perth Insulation Removal is often the first step to preparing an attic for new insulation. Old insulation can become damaged or contaminated by pest infestations or other issues.
Preparing to remove insulation requires the right tools and safety precautions. These include coveralls, a dust mask, and a specialized vacuum designed for insulation removal.
The effectiveness of your home insulation can degrade over time, which is why it’s important to inspect it regularly. In fact, experts recommend having your attic insulation inspected at least once every ten years.
In addition to reducing energy costs, insulation can help keep your family healthy by protecting you from toxins and allergens. Insufficient or damaged insulation can be a breeding ground for mold, and it can also impact your home’s air quality by allowing moisture to infiltrate the structure. In addition, pest infestations can damage the insulation, leading to gaps and thin spots that compromise the thermal performance of your home.
During your inspection, look for physical signs of damage like water stains or mold growth. Also check for a lack of ventilation which can impede the insulation’s performance. Make sure that soffit vents, ridge and gable vents are not obstructed by debris or insulation.
Different types of attic insulation are used in homes, including fiberglass batts, cellulose and spray foam. Each type has its own unique characteristics and requires a different approach for safe and effective removal. Learn about the various options, so you can choose the best one for your home.
Once you’ve done a thorough visual inspection of your attic, it’s time to start preparing for the removal process. Begin by assembling your tools and equipment. It’s also a good idea to cover the areas you don’t plan on working in with plastic sheeting. This will protect the attic floor and other areas from potential spills and messes.
Estimate the amount of time you need for the project based on the size of your attic and the type of insulation being removed. It may take longer if you’re dealing with a larger home or if the attic is particularly complicated to access.
Once you know how much insulation you need to remove, you can use a online calculator to estimate the total number of square feet and work hours required for the job. However, this is only a guideline and is based on general assumptions. Other factors such as the attic construction, weather conditions and other variables can increase or decrease your estimate.
Select the Right Tools
It’s critical to select the right tools for insulation removal, as different types of materials require different handling methods. For example, spray foam requires specialized tools that can be used to carefully scrape the material from surfaces without damaging structural elements like drywall and wood joists. Professionals also have access to chemical solvents that can dissolve adhesive properties and make foam insulation easier to remove.
Before beginning, prepare the attic by covering vents and ducts with plastic sheeting to prevent moisture intrusion during the removal process. Additionally, turn off power supplies to the attic area and use a ladder to climb into the space. Once in the attic, identify your insulation type and select a tool to get started.
For blown-in cellulose and fiberglass insulation, a vacuum designed for insulation removal is the best option. This machine can effectively suction the material, keeping your attic clean and preventing the spread of debris throughout your home. It is also helpful to have a rake handy, so you can gather loose insulation into manageable piles. Once the piles are large enough, simply place them into waste bags for disposal.
Foam insulation, on the other hand, is difficult to remove by hand and may be best left to professionals. A scrubbing brush can be used to break up the material and soften the adhesive, but the most effective method is to use a power rake that will effectively loosen and roll the insulation up.
As you remove the old insulation, take note of any signs of mold or mildew growth, which could indicate a moisture problem that needs to be addressed before installing new insulation. If you notice any dark spots, it’s also a good idea to consult a professional, as these are often indicators of asbestos that can pose significant health risks.
With proper preparation, a DIY attic insulation removal project can be a simple and cost-effective way to improve your home’s energy efficiency. However, for more complex or hazardous projects, a professional insulation removal service provides a wealth of experience and expertise to ensure a safe and successful outcome.
Follow Safety Precautions
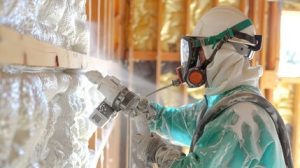
It is important to follow proper safety precautions when performing insulation removal, especially in contaminated or damaged areas. Using the right personal protective equipment (PPE) ensures your physical health and safety, while also fostering a sense of responsibility for your community’s well-being. For example, a respirator should be properly fitted to filter out harmful particles and dust that can be released during the process. Eye protection is also essential to prevent irritation and injuries from lingering debris or falling insulation. A pair of safety goggles will protect your eyes from irritating fibers and other contaminants while reducing the risk of injury in confined spaces like attics.
Similarly, it is critical to use heavy-duty waste bags that are durable enough to withstand the weight and sharp edges of the insulation you are collecting. Choosing bags with adequate capacity will minimize waste and reduce the number of bags needed for disposal, further minimizing your environmental impact. It is also a good idea to wear disposable coveralls during the process to minimize the transfer of contamination from clothing to your skin and respiratory system.
Before beginning, take the time to familiarize yourself with the attic space, identifying safe paths and areas where you can step without damaging the joists or drywall below. It is particularly important to pay attention to areas with moisture damage or signs of mold growth, as these will likely require additional inspection and treatment before proceeding.
When you are ready to begin, begin by removing any loose insulation from the attic floor and joists. This will help to clear the space for more thorough and efficient insulation removal. In addition, it is a great opportunity to inspect and seal air leaks between the attic and living spaces below. This will help to enhance your home’s energy efficiency and improve indoor comfort. Lastly, check to make sure there are no pests in the attic or around the openings for pipes, vents, and electrical conduits. If there are, you should consult with a pest control expert to address the issue before installing new insulation.
Dispose of Debris
As you remove insulation from your attic, make sure to take steps to properly dispose of the materials. This ensures that you don’t contaminate your home, expose yourself to harmful contaminants, or cause environmental harm. Follow disposal regulations as they apply to your location and type of insulation.
Airborne fiberglass particles can pose health risks when inhaled. Disposing of old insulation properly and sanitizing the work area can prevent this from occurring. Sanitizing can also reduce the risk of mold and rodent infestations.
Using a HEPA filter vacuum to clean up lingering particles and dust can help minimize the risk of respiratory irritation and further contamination. When the job is complete, air out your attic space and the rest of the home to eliminate any residual irritants and debris. Once the attic is clear, dispose of waste bags and sanitize your equipment before storing or cleaning for reuse.
Before starting the insulation removal process, clear a path from your home’s front door to the attic access. Position your insulation vacuum and hose, and prepare a set of waste bags for disposal. It’s a good idea to double bag the waste, as this helps prevent leakage and contamination. Begin the insulation removal process by starting at one end of your attic and working systematically across the space. This prevents overlooking any areas and ensures consistent, thorough removal.
For blown-in insulation, which is more difficult to remove than fiberglass batts, it can take up to 18 hours for an attic of about 1,500 square feet. The time can vary based on your experience and how quickly you’re able to move through the work. Be patient, and remember to take breaks regularly. For an even more efficient DIY insulation removal experience, partner with a friend or consider hiring professional help. Professionals can help you select the best new insulation for your home and ensure that it’s installed correctly and safely. They can also provide insights and advice on addressing any unexpected issues that arise during the project. Hiring a professional can make the entire insulation removal process less stressful and more cost-effective than DIY methods.